
Select.GroupBy: What’s New and What’s to Come
December 19, 2022
Announcing Synergy/DE 12.1.1.3287
March 1, 2023As the expectation for fast-paced product releases grows throughout the software industry, more and more software development organizations are adopting DevOps practices and cloud-based tools to pick up the pace. One of the key DevOps techniques that makes faster release cadences possible is CI/CD, which is an acronym for “continuous integration” and either “continuous delivery” or “continuous deployment.” CI/CD encompasses practices that automate builds, testing, and deployment as a continuous process, enabling issues to surface quickly while harnessing the speed of automation. This automation generally takes place using cloud-based tools, and at Synergex we’ve adopted CI/CD via Azure pipelines, which automate these operations in Azure DevOps. Azure pipelines are relatively easy to set up, and when defined using the YAML language, they can be very flexible and can accommodate complex CI/CD scenarios.
When Azure pipelines were first introduced, developers created and configured these pipelines exclusively via GUI screens that presented CI/CD operations as GUI options. Here’s an example of a GUI screen that enables developers to choose operations for an Azure pipeline:
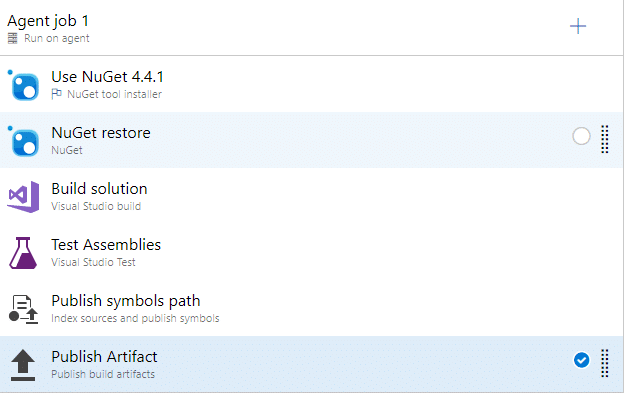
This approach can work for basic tasks, and developers can still use these GUI screens to configure Azure pipelines. But these GUI selections are not always interpreted correctly when pipelines are generated, so resulting pipelines do not always work as expected. Fortunately, as mentioned above, you can also set up Azure pipelines using YAML, which is a data serialization language (like JSON). Depending on whom you ask, YAML stands for either “Yet Another Markup Language” (its original meaning) or “YAML Ain’t Markup Language”. In any case, for some time now Azure DevOps has enabled developers to define pipelines by coding them in YAML, and Microsoft now recommends this method. This not only eliminates issues resulting from imperfect pipeline generation from GUI screen selections (one less variable when a pipeline fails), but it gives developers more control over pipeline operations and flow.
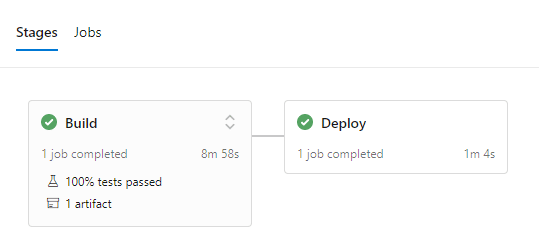
In this article, we’ll briefly look at the basic steps for setting up a simple YAML pipeline that builds, tests, and deploys. But first, let’s take a closer look at CI/CD. In simple terms, continuous integration (CI) is the automation of builds and testing every time a developer commits a change to version control. And continuous delivery or deployment (CD) is the automated deployment of built software to a test or production environment. CI/CD processes can be complicated, and that’s where YAML comes in. YAML enables you to code complex operations (e.g., multiple CI/CD workflows) in a single file, so that they all operate as one contiguous workflow, one pipeline. For example, once a build is completed and tested, a multi-stage YAML pipeline could then deploy the build to different environments for further testing before finally deploying to production. The figure below shows Azure DevOps reporting on the build and deployment stages of a simple pipeline we have for an internal service.
Before you start…
There are some prerequisites for creating Azure pipelines. You must have access to Azure DevOps with permissions to create pipelines, and you must have a deployment environment (e.g., a web service) for your pipeline to deploy builds to. Additionally, the source code for the software you are developing must be stored in a version control system. In the example pipeline we’ll look at in this article, we’ll select a Git repository in Azure, but you can use some other version control system such as Bitbucket or Subversion.
Creating the base YAML for a pipeline
Now let’s see how YAML is used by creating a simple YAML pipeline. We’ll start by instructing DevOps to set up a basic YAML file that will be the starting point for our pipeline and will be added as a .yml file to the repository we’ll select in this process.
After signing into Azure DevOps, we’ll select Pipelines in the navigation area, select the Pipelines option under that, and then click the “New pipeline” button in the upper-right of the Pipelines area.

Next, we’ll specify where the source code is coming from. For this example, we’ll use the “Azure Repos Git” option (the first option shown in the following screen capture), and then we’ll select the repository that the pipeline will be generated for. (Azure DevOps prompts you for this once you’ve selected the version control source.)

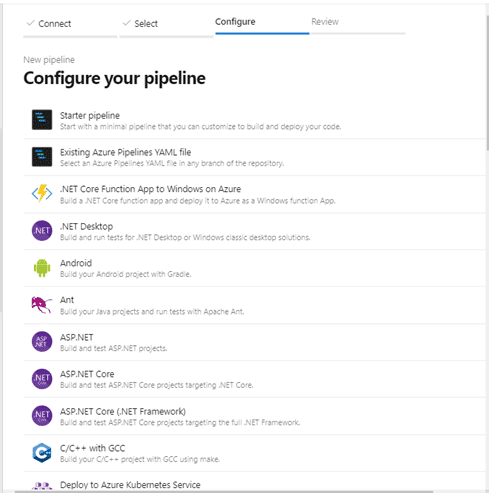
We’ll then select the type of project we want to use the pipeline for. The example pipeline we’re setting up here will deploy to an Azure web service, so we’ll select ASP.NET:
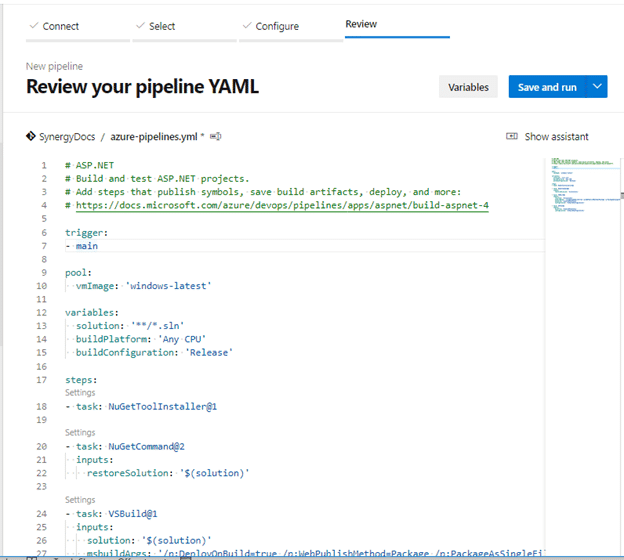
At this point, DevOps creates a basic YAML file from the choices we’ve made, and it displays that file in Azure DevOps:
Understanding YAML basics
Now we finally see what a YAML file looks like. We can add more code to this file to define pipeline operations, but first let’s break this starter code down a bit and see what it does by looking at some of the keywords it uses. For more information on YAML, including YAML keywords, and for information on Azure pipelines in general, see Microsoft’s documentation on Azure Pipelines.
trigger:
The trigger keyword at the beginning of the file causes the pipeline to run when a specified event takes place. In this case, the pipeline will run whenever an update is pushed to the specified repository branch, which is “main” in the code shown above.
pool:
The pool option specifies the agent that will be used to run pipeline operations. For the base pipeline we just set up, it defines the specs for the virtual machine image, ‘windows – latest’, that will be used to build the project. As of this writing, this is a Windows Server 2022 image with Visual Studio 2022. Other options include Ubuntu and MacOS virtual machines.
variables:
The variables keyword enables you to set system variables or define your own variables at the beginning of a YAML pipeline file. These variables are treated as environment variables when the pipeline is triggered. Most variables are defined using the format solution: ‘**/*.sln’. And once they are defined, you can generally use the following format to reference them elsewhere in the pipeline: $(solution).
stage:
Stages, which are defined by the stage keyword, delineate the larger divisions in a pipeline (and come after the stages keyword). For example, the following code is for a build stage. It is important to place tasks for a stage under the job section for that stage (e.g., job: Build) to instruct Azure DevOps that they belong only to that stage.

Likewise, we can add a deployment stage:

task:
Tasks define what the pipeline should do. The steps keyword must precede the task keyword, or you’ll get an invalid YAML structure error. You can add all sorts of tasks, but a minimal pipeline needs only build and deploy tasks.
When setting up tasks, keep in mind that Azure DevOps includes an “assistant” that can make adding tasks much easier. To open the assistant, click “Show assistant,” which is on the upper right of the editing pane when you’re editing a YAML file.

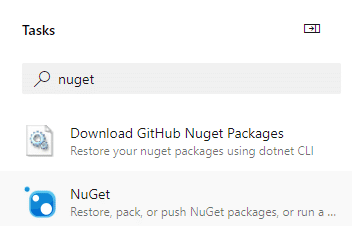
For example, we can use this assistant to set up a NuGet task that will restore NuGet packages before building the solution. To do this, in the YAML editor we’ll move to the location right before the build task, open the assistant, scroll down the task list, and select the NuGet option:
We’ll then supply information that the assistant prompts us for, and we’ll click Add:
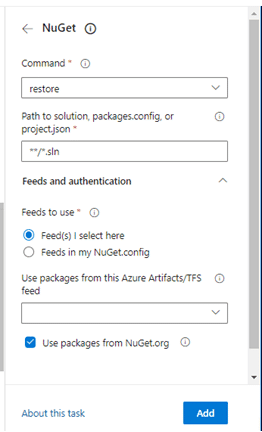
The assistant will generate code like the following, which we can modify, remove, etc., in the code editor:

If you are unfamiliar with writing YAML, using the assistant is a great way to get started adding tasks.
displayName:
The displayName keyword is used to specify the name that will be displayed for a task when the pipeline runs it. For example, in the following screen capture of a DevOps status window, the “Use .NET Core sdk 2.2x” label was not the original label for the task it represents. This label was added with a displayName setting.

inputs:
Inputs are the options that you can modify when adding a task. For example, the NuGet restore task we defined above takes required inputs for command, restoreSolution, and feedsToUse, which the assistant added for us.
Setting up deployment
The last part of our example pipeline will deploy the built app to an Azure web service. But before the pipeline can deploy, the Build stage needs to publish build artifacts for the pipeline. The following task lets the pipeline know where to get the files that are ready for deployment. This task and the other tasks we’re about to look at can also be created using the task assistant.
- task: PublishBuildArtifacts@1
      inputs:
        PathtoPublish: '$(Build.ArtifactStagingDirectory)'
        ArtifactName: 'drop'
        publishLocation: 'Container'
Then, in the Deploy stage, we need to download the build artifact to deploy:
- task: DownloadBuildArtifacts@1
      inputs:
        buildType: 'current'
        downloadType: 'single'
        downloadPath: '$(System.ArtifactsDirectory)'
        artifactName: 'drop'
Additionally, when deploying to an Azure app service, we must add a task to verify and authorize the Azure subscription and select the name of the app service the build will be deployed to. For example:
- task: AzureRmWebAppDeployment@4
      inputs:
        ConnectionType: 'AzureRM'
        azureSubscription: 'Visual Studio Enterprise Subscription – MPN(XXXXXXX)'
        appType: 'webApp'
        WebAppName: 'Some-Staging-Area'
        deployToSlotOrASE: true
        ResourceGroupName: 'Some-Staging-Area
        SlotName: 'staging'
        packageForLinux: '$(Build.ArtifactStagingDirectory)/**/*.zip'
In this example, packageForLinux is set to $(Build.ArtifactStagingDirectory)/**/*.zip because this is where the build artifact will be published in the last step of the Build stage. (The packageForLinux option is an alias for the Package keyword, and in the task assistant this is created using the “Package or folder” option.)
The completed pipeline
Now that we have a better sense of how YAML works and how we can use YAML to set up a pipeline, here’s a completed version of the pipeline we started above:
trigger:
- main

pool:
  vmImage: 'windows-latest'

variables:
  solution: '**/*.sln'
  buildPlatform: 'Any CPU'
  buildConfiguration: 'Release'

stages:
- stage: Build
  jobs:
  - job: Build
    steps:
    - task: NuGetCommand@2
      inputs:
        command: 'restore'
        restoreSolution: '**/*.sln'
        feedsToUse: 'select'

    - task: PowerShell@2
      displayName: Start CosmosDB Emulator
      inputs:
        targetType: 'inline'
        script: |
          Import-Module "$env:ProgramFiles\Azure Cosmos DB Emulator\PSModules\Microsoft.Azure.CosmosDB.Emulator"
            Start-CosmosDbEmulator

    - task: UseDotNet@2
      displayName: 'Use .NET Core sdk 2.2.x'
      inputs:
        version: 2.2.x

    - task: NuGetToolInstaller@1

    - task: NuGetCommand@2
      inputs:
        command: 'restore'
        restoreSolution: '$(solution)'
        feedsToUse: 'select'

    - task: VSBuild@1
      displayName: 'Build solution'
      inputs:
        solution: '$(solution)'
        msbuildArgs: '/p:DeployOnBuild=true /p:WebPublishMethod=Package /p:PackageAsSingleFile=true /p:SkipInvalidConfigurations=true /p:PackageLocation="$(Build.ArtifactStagingDirectory)\\"'
        platform: '$(BuildPlatform)'
        configuration: '$(BuildConfiguration)'
        clean: true

    - task: VSTest@2
      displayName: 'Run Tests'
      inputs:
        testSelector: 'testAssemblies'
        testAssemblyVer2: |
          **\$(BuildConfiguration)\*Test*.dll
          **\$(BuildConfiguration)\**\*Test*.dll
          !**\*Microsoft.VisualStudio.TestPlatform*
          !**\obj\**
        searchFolder: '$(System.DefaultWorkingDirectory)'
        codeCoverageEnabled: true
        platform: '$(buildPlatform)'
        configuration: '$(buildConfiguration)'

    - task: PublishSymbols@1
      displayName: 'Publish symbols path'
      inputs:
        SearchPattern: '**\bin\**\*.pdb'
      continueOnError: true

    - task: PublishBuildArtifacts@1
      inputs:
        PathtoPublish: '$(Build.ArtifactStagingDirectory)'
        ArtifactName: 'drop'
        publishLocation: 'Container'

- stage: Deploy
  jobs:
  - job: Deploy
    steps:
    - task: DownloadBuildArtifacts@1
      inputs:
        buildType: 'current'
        downloadType: 'single'
        downloadPath: '$(System.ArtifactsDirectory)'
        artifactName: 'drop'
    - task: AzureRmWebAppDeployment@4
      inputs:
        ConnectionType: 'AzureRM'
        azureSubscription: 'Visual Studio Enterprise Subscription – MPN(XXXXXXX)'
        appType: 'webApp'
        WebAppName: 'Some-Staging-Area'
        deployToSlotOrASE: true
        ResourceGroupName: 'Some-Staging-Area
        SlotName: 'staging'
        packageForLinux: '$(Build.ArtifactStagingDirectory)/**/*.zip'
When this pipeline is triggered, it will build, run tests, and deploy:
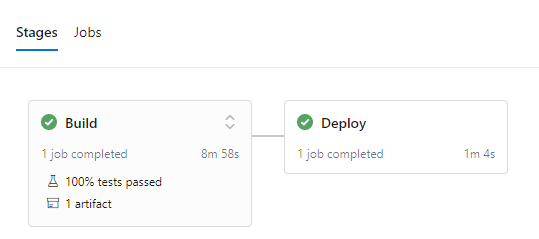
As you can see, YAML gives you a great deal of control for building, testing, and deploying projects. We’ve looked at a simple example of what can be done with YAML, but there are a plenty of complexities that can come into play, and there are other neat tricks that are possible with YAML pipelines. Hopefully it’s apparent that with the right tooling CI/CD isn’t a pipe dream. It is achievable, and it can put you on the path to greater efficiency and faster delivery of your products.

