Announcing a New Product Downloads Site
June 9, 2020xfBBQ: Full-Stack Web Development with Harmony Core
June 15, 2020One of the most significant new features introduced in Synergy/DE 11.1.1d is a unit testing framework for traditional Synergy. The framework is based on the MSTest framework that we have supported in Synergy .NET for some time and is delivered as a component of our Synergy DBL Integration for Visual Studio product.
Introduction
Unit testing is a method of testing software at a low level, usually at the level of individual subroutines, functions, and methods. Unit tests are frequently written by the same software developers that write the code being tested, and sometimes, in the case of test-driven development, even before the actual code being tested.
The idea is to exercise each routine in as many different scenarios as you can think of, passing various combinations of parameters, both correct and incorrect, and perhaps by altering the execution environment. The goal is to prove that the routine responds correctly in all cases when used correctly, and also to prove that it fails appropriately in all cases when it should fail.
Unit tests are generally small and fast to run individually, but numerous. It is not uncommon to have hundreds or even thousands of unit tests, and, ideally, those tests execute quickly enough to make it feasible to run them frequently.
In some environments, unit tests are configured to run each time the developer builds a new version. In other environments, tests might run as part of a “continuous integration / continuous deployment (CI/CD) pipeline that runs each time developers attempt to check code into a central repository, and the failure of a unit test might cause the check-in of the code to fail.
Adding Unit Tests to a Solution
To make adding unit tests easy, we have provided a new Visual Studio project template named “Unit Test (Traditional).” It adds a traditional Synergy ELB project to your solution, and that project contains some sample unit test code.
Adding Test Classes and Test Methods
Unit test projects contain unit test classes, and a unit test class is simply a class that is decorated with a {TestClass} attribute. Here is an example:
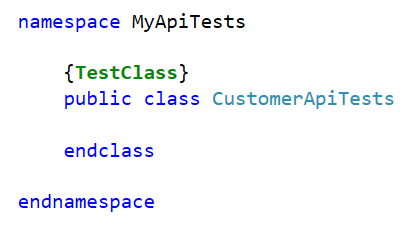
A unit test project can include any number of unit test classes. Generally, a test class groups together a related set of tests. In the case of the code above, notice the name of the class is CustomerApiTests. Presumably, tests that exercise a Customer API are to be added later.
Each test class contains one or more test methods, which are, once again, decorated with an attribute. In this case the {TestMetod} attribute. Here is an example of a test class containing several test methods:
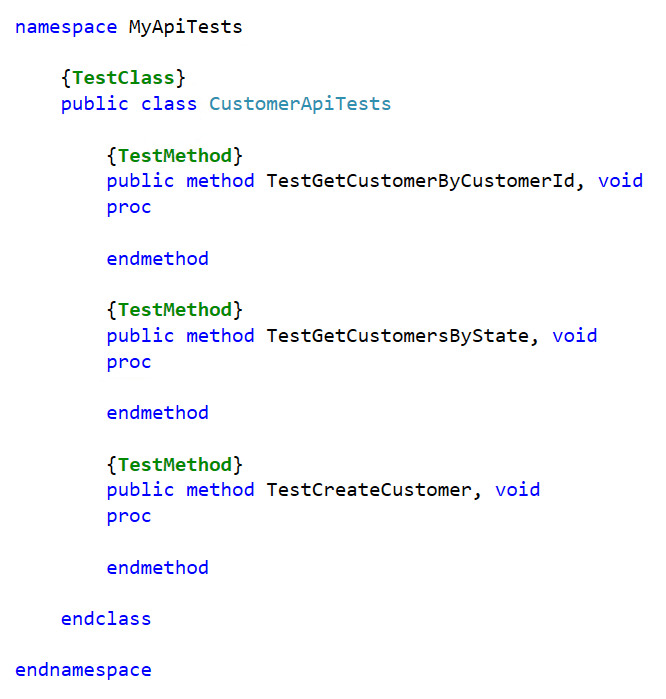
The code above declares three test methods, each of which tests a particular piece of functionality of the API. But this is just a simple example. In an actual test class, there may be several test methods to test each of the API functions in different ways. The number of test methods per function is typically determined by how complicated the function is, how many parameters it has, how many different things it can do based on those parameters, etc.
Coding Test Methods
Each test method typically contains a small amount of code, sufficient to test a particular scenario. The operating environment must be the same each time a particular test runs; we’ll talk more about that later. Here is an example of a test method that contains some simple code.
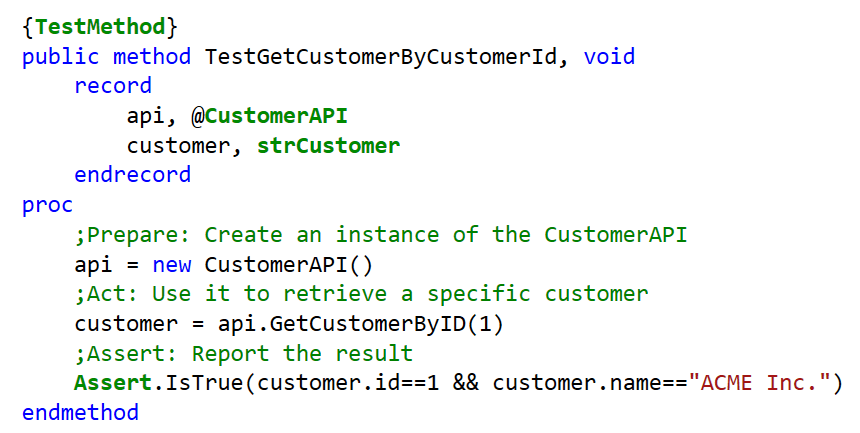
When writing unit tests, many developers follow what is known as the “AAA Pattern,” which stands for “Arrange, Act and Assert.” First, you arrange (or prepare) whatever is needed to execute the test, then you “Act” by executing the test, and finally, you “Assert” the result of the test. The name of this final phase is interesting because, in MSTest, Assert is the name of the actual class used to notify the framework of the results of a test.
In the example above, the arrange phase involves creating a new instance of the CustomerAPI to use for the test. The Act phase then uses that object to make a call to the API function to be tested. And in the Assert phase, the code checks that the expected customer record was returned.
The Assert Class
The Assert class has many different static methods used to signal success or failure based on various scenarios. The method you choose to use depends on the nature of the tests that you need to execute to determine the success or failure of the test. Some examples of Assert methods are:
Assert.AreEqual(expectedObj, actualObj)
Assert.AreNotEqual(notExpectedObj, actualObj)
Assert.AreSame(expectedObj, actualObj)
Assert.AreNotSame(notExpectedObj, actualObj)
Assert.Fail()
Assert.Inconclusive()
Assert.IsTrue(condition)
Assert.IsFalse(condition)
Assert.IsNull(object)
Assert.IsNotNull(object)
Most of these methods also have several overloads with different combinations of parameters. For example, most also have a variant that allows an error message to be recorded in the case of a failing test, and more. In traditional Synergy, the Assert class is located in the Synergex.TestFramework namespace, along with the various attributes mentioned earlier.
By the way, I should mention that if any test method fails with an error, or throws an exception, then the test framework catches those errors and exceptions and reports them as test failures in the Test Explorer window.
Building Tests
When you build a solution that includes a unit test project, that project builds just like any other traditional Synergy ELB. It is likely that the code being tested by your unit tests exists in one or more other projects in your solution, so to give your unit tests access to that code, you simply add references to the other projects. Also, if you are using a Synergy repository project, and your unit tests require repository data definitions, then also add a reference to the repository project in the usual way. And like other Synergy projects in Visual Studio, if your development environment and code rely on the values of environment variables that are defined using the “Common Properties” method, you may need to opt- into those common properties via the project properties dialog in the usual way.
The Test Explorer Window
Visual Studio includes a piece of UI called the Test Explorer. If you don’t see it already displayed, you can display it by using the menu commands Test> Test Explorer.
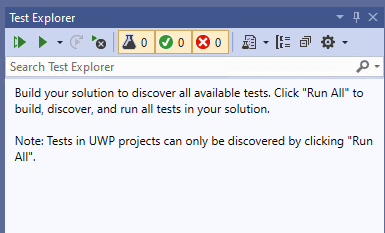
When the Test Explorer window it first displayed, it often starts out empty, but notice the instructions that are displayed in the window, which says, “Build your solution to discover available tests.”
Once you build a project that contains unit test classes and methods, the Test Explorer window will discover and display your tests:
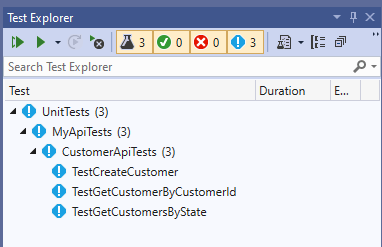
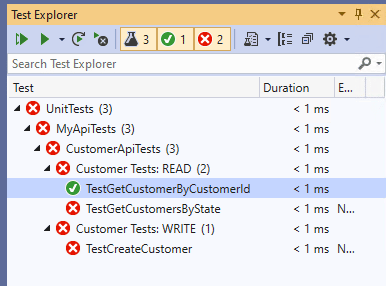
By default, your tests are displayed in a hierarchy based on your project name, namespace, and class, and then the individual methods are displayed below each class.
Notice the two green buttons to the left side of the Test Explorer toolbar. These are the Run All Tests and Run Test buttons. In my sample scenario, only one of the tests contains any code; the other two test methods are configured to throw an exception that says “Not implemented.” Here’s what happens when the Run All button is clicked:
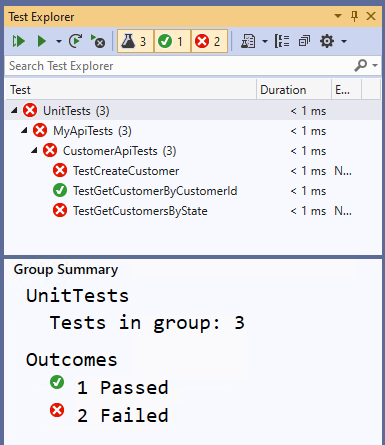
As you can see, Test Explorer is presenting a summary of what happened when it attempted to run each of the three methods. One test passed, and two failed. Notice the color-coded icons, green is good, red is bad, and notice that all of the parent folders are also red. For a parent folder to show a green icon, all tests below must pass.
Also, notice how the Group Summary pane is displaying a summary of the pass/fail information. This is because we have a folder node selected in the tree. If we select an individual test, then the pane displays the details of the result of that specific test:
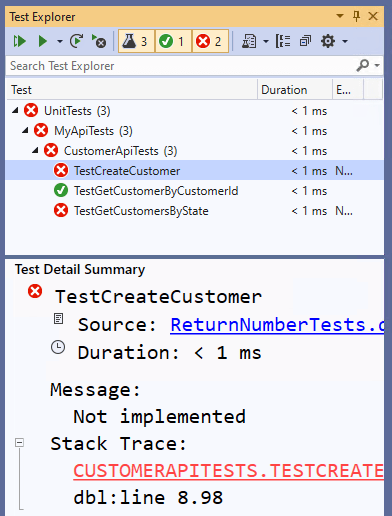
In addition to executing all tests or a single test, you can also select a number of tests, and use the right-click menu to execute just that set of tests:
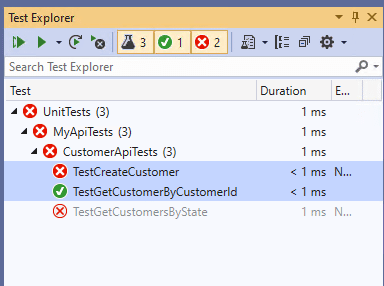
In the above screenshot, you can see that the third test was not executed, which is indicated by the light color of its icons background.
Debugging Tests and Tested Code
In addition to merely running tests, it is also possible to use the Test Explorer to launch debugging sessions for specific tests. To do so, right-click on the test and select Debug. A debugger session will start, and the debugger will break in the test method. You can debug the test method, and as long as you have the source code available, you can also step through into the underlying code being tested.
Organizing Tests
As the number of tests in your environment grows, it is likely that the sorting and filtering methods provided by the Test Explorer may not be enough to allow you to work efficiently. For this reason, it is also possible for you to apply custom categorizations to your tests in code.
This is done by decorating your test methods with an additional attribute named {TestCategory}. Here is an example:
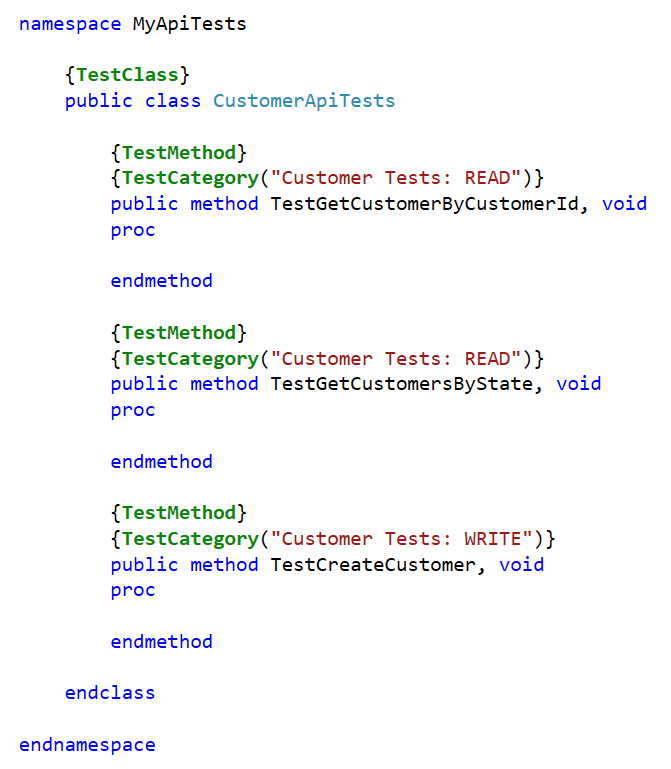
And having done so, there are options in the Test Explorer toolbar to modify the display hierarchy to include “Traits,” which are the custom attributes that you have applied to your test methods. Here is an example of that:
Environment Initialization and Cleanup
As you start to really get into writing unit tests, you will quickly realize that a big part of the road to success lies with your ability to always run your tests in a consistent and known state. For example, if your tests are reading and writing data files, those data files need to be in a known good state.
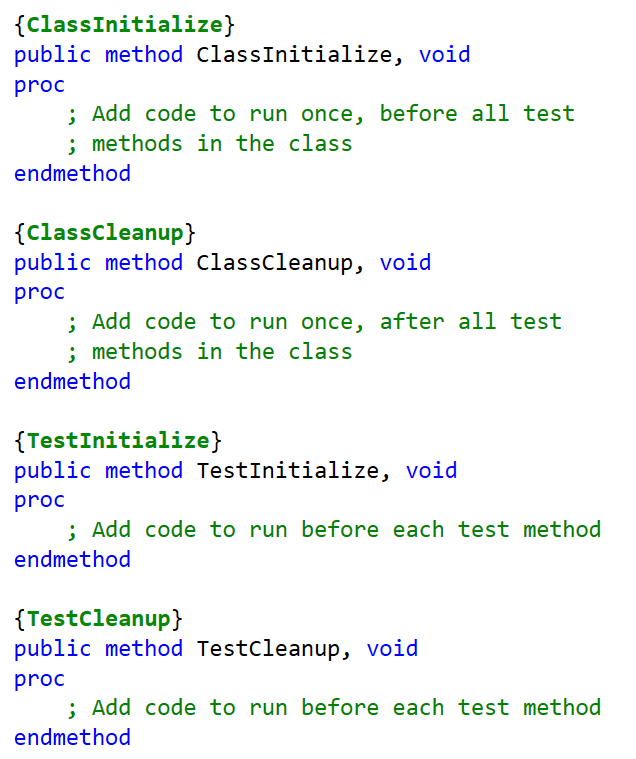
To help with that, the framework provides some special functionality that can be used to establish and reset the environment, if necessary. In MSTest, there are six such mechanisms; in traditional Synergy, we currently support four of them. These are:
- ClassInitialize – runs once, BEFORE any test in the class runs
- TestInitialize – runs BEFORE EVERY TEST in the class
- TestCleanup – runs AFTER EVERY TEST in the class
- ClassCleanup – runs once, AFTER all tests have completed
You can optionally add methods to your test class to provide each of the functions that you require. To do so, you simply add public void methods, decorated with an appropriate attribute, like this:
For example, if you are testing an API, and that API is completely stateless, then instead of creating an instance of the API in each method, then using it and discarding it, you could use a ClassInitialize method to create an instance of the API, code all of your test methods to use that same instance, then delete the instance in the ClassCleanup method.
If your API is not stateless and you do require a new instance for each test, you could simplify the code in each test by defining the code to instantiate the API in a TestInitialize method and discard it in a TestCleanup method. The runtime overhead is the same, but you only have to code the APU creation one time instead of potentially hundreds of times.
In MSTest, there is a third level of Initialization and Cleanup that happens at the “Assembly” (ELB in this case) level. This is implemented the exact same way, via the attributes {AssemblyInitialize} and {AssemblyCleanup}. We do plan to add that support; it just didn’t make it into the initial release.
Summing Up
This post is not intended to be a complete guide to the subject of unit testing in Traditional Synergy, and indeed there are other features that have not been discussed here. Instead, the intention was to provide enough information to pique your interest, and hopefully, that goal was achieved.
I encourage you to refer to the Synergy documentation for additional information, and we are looking forward to receiving your feedback on this important new technology for traditional Synergy.

