Training Others to Continue the Job
March 29, 2023
Announcing SDI 2023.03.1080
April 4, 2023The usual way to build software products during development is with an integrated development environment (IDE) such as Microsoft Visual Studio. Code changes are made in the IDE, and the IDE has features for building and debugging code. It all happens in the same convenient environment, which is generally ideal during development. For building a shippable product, however, this approach is less than ideal in many cases, such as
- When the product needs to be part of a larger bundled set of products
- When additional operations (secure signing, testing, staging, etc.) take place after the product is built
- When the product is developed in a continuous integration/delivery (CI/CD) system, or when there is a goal to move to a CI/CD system
In this article, we will focus on the last of these, building in a CI/CD system, which in simplified form looks something like this:

Consider the Build step in this scenario. Building from the IDE is not ideal for CI/CD because in a fully automated environment, the result of a build should be immediately consumed by a testing infrastructure. Additionally, with CI/CD it is generally best for builds to occur in a separate environment—i.e., in a dedicated build environment. However, a build environment may not be able to launch the IDE due to machine settings, resources, licensing, or other environmental limitations. But if IDE builds are not ideal for CI/CD, how should the product be built in this situation?
Enter the MSBuild command-line interface (CLI).
MSBuild is Microsoft’s engine for building applications and libraries from Visual Studio projects and solutions. It is included in Visual Studio, and it runs behind the scenes when a build is invoked from Visual Studio. However, MSBuild is also available as a stand-alone product with a CLI that provides command-line equivalents for Visual Studio’s build functionality. Given a Visual Studio project or solution file, MSBuild can build the product from a single command. This solves several CI/CD-related issues:
- Because the stand-alone version of MSBuild is portable and can operate without Visual Studio, it simplifies requirements for machines dedicated to product builds. There is no need for Visual Studio licenses or extensive resources. This is especially useful for automatically provisioned machines in the cloud or in a pipeline environment.
- There is a stand-alone 64-bit version of MSBuild, but only the 32-bit version is available from within Visual Studio. So if you need the 64-bit version for a build, the CLI is your only option.
- The MSBuild CLI is automation friendly. It is much easier to automate a command-line build than to configure automation for a Visual Studio build.
- A command-line build can easily be run as part of a larger automation process that builds multiple products and bundles them or prepares them to be consumed in subsequent automation processes (signing, validation, testing, etc.). The same applies when a product has other requirements, such as environment setup or dependencies that require other components to be built prior to the product build. A command-line build is also ideal if a product has pre- or post-build processing requirements.
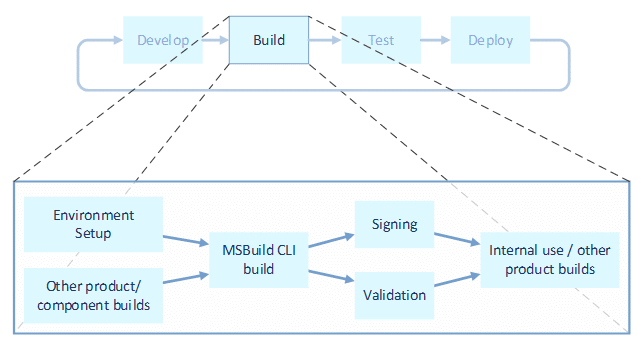
To illustrate how MSBuild CLI can be part of a larger CI/CD cycle, the following shows an expanded view of the Build step in the previous diagram:

As you can see from this diagram, an IDE build would not fit well as a replacement for “MSBuild CLI build,” particularly in a fully automated environment.
We have been discussing why the MSBuild CLI should be used for product builds in a CI/CD environment. Now let’s examine how it is used. The stand-alone version of MSBuild comes as an executable that supports many build options through command-line switches. We will cover some of the most commonly used options below, but first let’s discuss how to install MSBuild as a stand-alone product. The stand-alone installer is available on the main download page for Visual Studio:
https://visualstudio.microsoft.com/downloads/
Look for “Build Tools for Visual Studio 2022” on the page, or use the following direct link (subject to change):
https://visualstudio.microsoft.com/thank-you-downloading-visual-studio/?sku=BuildTools&rel=17
Once you have installed MSBuild, there will be an msbuild.exe file at the location you chose for the installation. This file is the MSBuild executable, which you’ll specify at the command line. In the most basic case, you can specify just “msbuild” followed by the project or solution file you want to build. For example:
msbuild MySolution.sln
This command will build a solution named MySolution using the default configuration and platform for that solution. (The default is usually the “Debug” configuration and the “Any CPU” platform.) Again, this is the simplest form of MSBuild command. To exercise more control over a build, you can use command-line switches to specify build behaviors. The following are some commonly used switches. MSBuild supports ‘/’ or ‘-’ for switches, but for simplicity’s sake, we’ll use the ‘-’ form in the following.
- -property:name=value or -p:name=value
The -property (or -p) switch enables you to provide or override an MSBuild property. The most common use for this is to select a specific configuration or platform. For example, the following will produce a build based on the Release configuration and the x64 platform:
msbuild.exe -p:Configuration=Release -p:Platform=x64 MySolution.sln
Of course, this switch is not limited to just configuration and platform. It can be used to specify any MSBuild property. A common use for -p when building Synergy projects is to specify the solution directory for the project, since some of the SDI tooling relies on the SolutionDir property setting when building a particular project instead of the solution. For example:
msbuild.exe ‑p:Configuration=Release ‑p:Platform=x64
‑p:SolutionDir=”C:\dev” MySynProj.synproj
- -maxCpuCount[:number] or -m[:number]
The -maxCpuCount (or -m) switch specifies the maximum number of concurrent MSBuild processes allowed when building. If no number is specified, MSBuild uses the number of processors in the computer as this maximum. This feature allows for parallel builds of the projects in a solution, which results in faster overall build times.
- -target:targets or -t:targets
The -target (or -t) switch specifies MSBuild targets to run. If this switch is not specified, MSBuild will run the “Build” target for the specified project/solution. For example, if you want to rebuild the solution instead, use this switch to specify Rebuild. For example:
msbuild.exe -t:Rebuild MySolution.sln
This switch also supports multiple targets in a semicolon delimited list. So, if you want to be explicit and specify a clean and then build (instead of specifying a rebuild), you would use a command like the following:
msbuild.exe -t:Clean;Rebuild MySolution.sln
- -verbosity:level or -v:level
The -verbosity (or -v) switch enables you to control the level of build information to be displayed or logged. Options are q[uiet], m[inimal], n[ormal] (which is the default), d[etailed], and diag[nostic]
- -graphBuild[:True or False] or -graph[:True or False]
When set to True, the -graphBuild (or -graph) switch causes MSBuild to construct a graph identifying project dependencies. MSBuild will also attempt to build project references prior to building the projects that reference them. (This is supported only for MSBuild 16 and higher.)
The full list of switches, along with more complete switch documentation is available at https://docs.microsoft.com/en-us/visualstudio/msbuild/msbuild-command-line-reference?view=vs-2022.
To recap, the MSBuild CLI is ideal for building products in a CI/CD system or in any fully automated system. The MSBuild CLI provides benefits unavailable with a Visual Studio build, including a more automation-friendly interface, fewer machine resource/licensing requirements (because it is a stand-alone tool), and easier set up for pre- and post-build requirements.
We hope this article encourages you to use the MSBuild CLI in your build environment and to adopt automation or CI/CD in your product development process. As always, we are excited to hear from you. If you have any questions or comments, contact Synergy/DE Developer Support or post in the Community area of the Synergex Resource Center. We will be happy to answer your queries!

