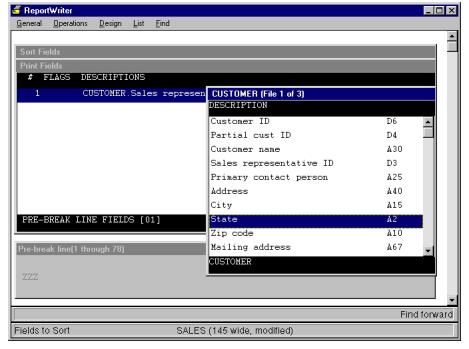
A pre-break line is printed at the beginning of a report break. A post-break line is printed at the end of a report break, following the break summary line.
Break lines can contain the following types of fields: text, data, environment, question, calculation, subtotal access. Any data field printed on a pre-break line uses the values from the first record of the break set. Any data field printed on a post-break line uses the values from the last record of the break set.
A pre- or post-break line can include up 99 fields, with a maximum width of 255 characters. One pre-break and one post-break line can be associated with each break field.
The following instructions refer to the “pre-break line,” but they apply to post-break lines as well.
Selecting a field to print on a break line
| 1. | Highlight the break field (indicated by a B or b in the FLAGS column) to which the line will be assigned in the Sort Fields list. |
| 2. | Select Sort functions > Pre-break line. Two lists and a window are displayed. (See figure 1.) |
- In the center of the screen is the Print Fields list. (If you’re creating a new break line, this list is empty.) As fields are selected from the list of available fields, they’re placed in the Print Fields list. The Print Fields list displays field descriptions by default.
- On the right side of the screen is the list of available fields. This list contains the fields that are available from the files chosen as files to read.

The list of available fields displays automatically only the first time a break line is added. If you don’t see this list, select Field functions > Add fields. Additional fields are added below the field highligted in the Print Fields list.
- Near the bottom of the screen is a window that displays the current layout of the pre-break print line. (If you’re creating a new break line, this window is empty.) Each break line field that you select is represented by its format, if one exists. Otherwise, it is represented by its default format:
@
Alpha, user, and enumerated fields
Z
Numeric fields
MM/DD/YY
Date fields
HH:MM
Time fields

| 3. | From the list of available fields, highlight the field you want to include on the break line. |
| 4. | Press Enter. (See Choosing Fields for more information about selecting fields.) |
When you select a field, it appears in the Print Fields list and in the layout window at the bottom of the screen. New fields are added below the highlighted field in the Print Fields list. The layout window automatically scrolls so that the currently selected field is always visible.
As an example, we’ve included the Sales representative ID field in the pre-break line, as shown in figure 1. We also removed the Sales representative ID field from the detail lines, so that it prints only once for each sales rep in the report.
| 5. | Press the Exit shortcut when you’re finished. |
|
|
Once you exit the list of available fields, if you want to select additional fields to print, you must use the Add field or Add fields function. |
Suppressing a blank line
Pre- and post-break lines are separated from the records in that break set by a blank line.
To suppress the printing of this blank line, select Line functions > Suppress blank line.The Suppress blank line entry is a toggle; select it again to print the blank line.
The text at the bottom of the layout window tells you if the blank line is currently being suppressed.
Assigning a conditional to a pre- or post-break line
You can define and assign a conditional to each pre- and post-break line. This causes the break line to be printed only when the specified conditional is true. You can connect up to five conditionals (with AND and OR) and assign them to a break line.
| 1. | Select Line functions > Specify line conditions to display the Condition Criteria list. As you define conditions, they are added to the end of this list. |
- If you haven’t defined any conditions for the break line, this list is empty and the Criterion Definition window is also displayed.
- If a condition has already been defined for this break line, select Condition functions > Add condition.
| 2. | See Assigning a conditional to a field for more information on specifying a conditional. |
If you select an arrayed field for use in a conditional, ReportWriter always uses the first element of the array. To subscript the array, specifying an element other than the first one, use a calculation field to assign the array element to a temporary field.
| 3. | To save your conditional and return to the Condition Criteria list, exit the window. |
If you’ve defined a conditional for the break line, the word “Conditioned” is displayed at the bottom of the layout window.
|
|
A sort field’s associated conditionals are deleted when you clear the field’s break status. |
Modifying a pre- or post-break line conditional
To copy, edit, move, or delete conditionals, refer to the following:
